Creating a personalized crystal initial ornament is a delightful way to add a touch of sparkle to your holiday decor or as a unique keepsake. The shimmering crystals catch the light beautifully, making this ornament not just a decorative piece but also a conversation starter. Whether you hang it on your Christmas tree or display it in your home, this ornament showcases creativity and personal flair. You may also find Diy Personalized Crystal Letter Ornament useful.
In this guide, we’ll walk you through the steps to craft your own personalized crystal initial ornament. It combines a charming touch with a straightforward process, making it perfect for crafters of all levels. Let’s get started! You may also find Diy Crystal Firework Ornament Christmas Decor useful.
Why You’ll Love This Project
This project offers numerous benefits that make it an appealing choice for DIY enthusiasts. Here are a few reasons to consider:
- Display-Worthy Result: The final product is visually stunning, reflecting light in captivating ways that brighten up any space.
- Customizable: You can choose different colors and styles of crystals, making each ornament unique.
- Approachable Technique: The process is simple enough for beginners but allows for intricate designs that seasoned crafters will enjoy.
- Gift Potential: Personalized ornaments make thoughtful gifts for friends and family, especially during the holiday season.
- Seasonal Decor: These ornaments can fit into many decor styles, allowing you to switch them out seasonally or for special occasions.
To enhance your crafting repertoire, you might also want to explore other related projects, such as a personalized crystal monogram ornament that beautifully complements this piece.
Before You Begin
Before diving into the crafting process, prepare your workspace and gather your materials. Ensure you have a clean, flat surface to work on. Additionally, consider protecting any surfaces that might get adhesive or glitter on them. Organizing your crystals and tools ahead of time can make the process smoother and more enjoyable.

Materials You’ll Need
- Clear acrylic disc forms the base for the crystals.
- Colored crystals choose a variety that match your desired design.
- Adhesive a strong craft glue that dries clear works best.
- Ribbon or twine for hanging the ornament.
- Scissors to trim the ribbon as needed.
Tools
- Tweezers for precise placement of the crystals.
- Craft knife if any adjustments are needed to the acrylic disc.
- Ruler to measure ribbon lengths accurately.
How to Make the Project
Step 1: Prepare the Base
Begin by laying your clear acrylic disc flat on your workspace. This will serve as the base for your personalized ornament.
Step 2: Arrange Your Crystals
Use tweezers to pick and place your colored crystals in the shape of the initial you want to create. It’s helpful to plan your design before gluing anything down. You may want to follow a layout inspired by other designs, such as a crystal beaded Christmas ornament for additional ideas.
Step 3: Secure the Crystals
Once you’re satisfied with the arrangement, apply a small amount of adhesive to the bottom of each crystal and press it gently onto the acrylic disc. Ensure each piece stays securely in place. Allow the glue to dry according to the manufacturer’s instructions.
Step 4: Attach the Ribbon
After your ornaments’ crystals are fully dried, cut a length of ribbon or twine for hanging. Securely tie it at the top of the acrylic disc, allowing for a loop to hang it as desired.
Step 5: Final Touches
Inspect your ornament for any loose crystals or residue from the glue. Make any necessary adjustments, and your personalized crystal initial ornament is ready to hang.
Tips for the Best Result
- Plan Your Design: Sketch your initial layout before securing the crystals to visualize the final look.
- Avoid Glue Overflow: Use a small amount of adhesive to prevent excess from spilling onto the surfaces of the crystals.
- Choose Coordinating Colors: When selecting your crystals, try to stick to a theme or color palette that enhances the overall look of your space.
- Let It Dry Completely: Ensure all elements are fully dried before hanging to avoid any mishaps.
Customization / Variations
Feel free to customize your ornament to suit your style. You might consider varying the colors of the crystals based on seasonal themes or personal preferences. Selecting alternative shapes or sizes of the acrylic disc can also create a different visual effect.
Ideas for Styling Your Handmade Decor
Your finished ornament can be displayed in various ways. You might hang it on your Christmas tree, attach it to gift packages for a personal touch, or even use it in a window to catch the light beautifully. Pair it with other ornaments, such as a DIY crystal icicle ornament, to create a cohesive decoration theme.
Care and Storage
To keep your crystal ornament looking beautiful, dust it gently with a soft cloth to avoid buildup. Store it in a cool, dry place when not in use to prevent damage.

Frequently Asked Questions
Can I use different types of crystals for this project?
Absolutely! Mixing different kinds of crystals can add visual interest, but make sure they adhere well to the surface and each other.
How long does the glue take to dry?
This depends on the adhesive you use, but generally, allow 24 hours for a strong hold.
What if I don’t have acrylic discs?
You can use a sturdy piece of cardboard or wood as an alternative, but be mindful of the surface finish.
How can I make the initial stand out more?
Consider using a contrasting color for your crystals or outline the initial with smaller beads for a frame-like effect.
Is this project suitable for kids?
With supervision, this project can be a fun activity for older children, especially with a focus on placement and design.
Can I personalize this ornament for a special occasion?
Yes! You can customize it further by adding dates or names using smaller beads or rhinestones.
Conclusion
Making a personalized crystal initial ornament is a great way to create something meaningful and beautiful. This shimmer-filled keepsake is perfect for displaying in your home or gifting to loved ones during special occasions. If you’re looking for more inspiration, consider exploring the selection of unique ornaments and decor on platforms like Etsy or check out festive offerings on Amazon. Enjoy your crafting journey!
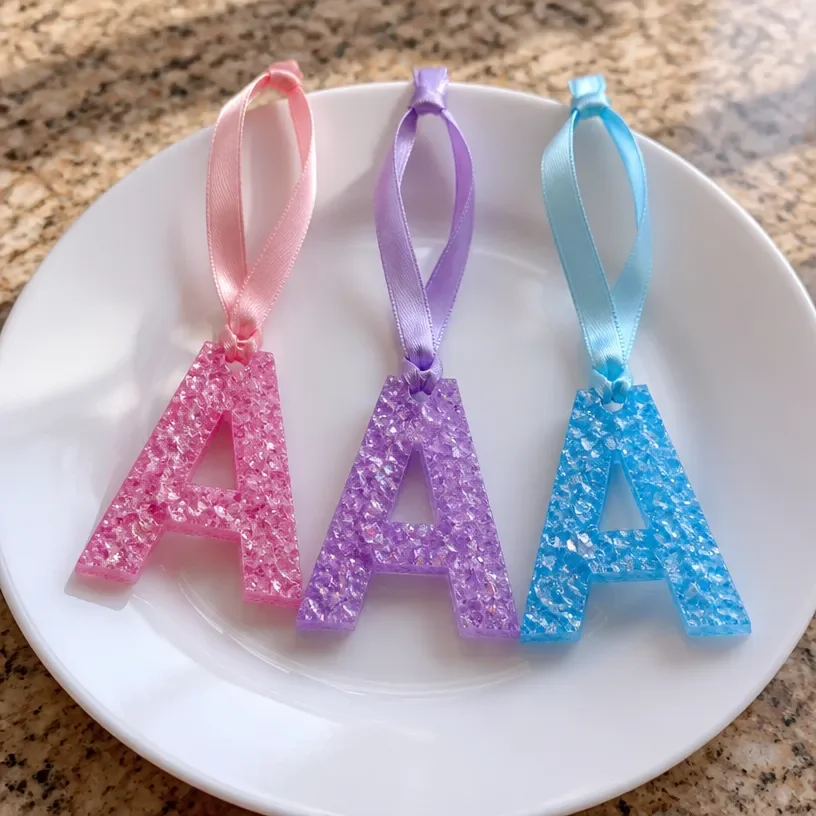
Personalized Crystal Initial Ornament
Ingredients
Method
- Lay your clear acrylic disc flat on your workspace.
- Use tweezers to arrange colored crystals in the shape of the desired initial.
- Plan your design before gluing anything down.
- Apply a small amount of adhesive to the bottom of each crystal and press it onto the acrylic disc.
- Allow glue to dry according to the manufacturer’s instructions.
- Cut a length of ribbon or twine and securely tie it at the top of the acrylic disc for hanging.
- Inspect the ornament for any loose crystals or glue residue.
- Make adjustments as necessary.